You may learn how to replace your kitchen sink replacement in 6 easy stages by using the advice below. To help readers comprehend each stage, the book contains illustrations and visual representations. This tutorial will assist if your sink is leaking water or if you just wish to replace it. To prevent legal problems, make sure to speak with your landlord before trying the kitchen sink replacement.
Make sure your sink arrangement is identical before using this instruction; some sinks are constructed differently and would necessitate a different procedure. It’s crucial to repair your sink since they might corrode over time and start to leak.
Getting Ready To Remove & Replace A Kitchen Sink
Even while installing a kitchen sink is not the largest project in the DIY guide, it is by no means the smallest, and some planning will be well worth it when it comes to getting started.
You must choose a kitchen sink that is proportioned properly for a straight changeover if we are replacing an existing sink with an existing cutout in the worktop.
Of course, if you have a different-sized kitchen sink in mind, you will need to install a new section of counter top or carve out more of your existing one.
Taking out A Kitchen Sink
You will require:
- Flexible wrenches
- Pliers
- Knife
- such as a Stanley or screwdriver
- Old towel
- little bucket
Take a photo of your plumbing arrangement beneath the kitchen sink before you yank out your old unit for your own reference and the reference of a plumber in case the unimaginable happens!
Step 1: turn off the water
Shut off the water supply lines first. The shutoff valves are most usually in the cabinet behind the sink, but if you can’t find them, you may just cut off the main water supply to your house.
To release any leftover water pressure in the water pipes, turn on the faucets in your kitchen sink.
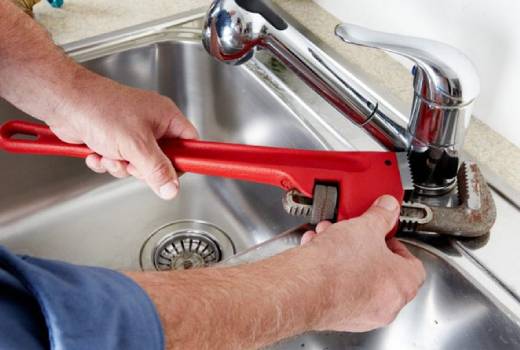
Step 2: Cut the water supply lines off
Using your adjustable wrenches, next, disconnect the water supply lines from your faucets. Because some water will unavoidably stay in the lines, get your little bucket ready underneath the lines.
Step 3: Cut the Drainpipe off
To properly unplug the drainpipe, any food disposal machines, and dishwasher drain lines, use pliers. When disconnecting specialized equipment like these, check the manufacturer’s instructions to make sure you don’t break anything. To clean up any spills, you may also keep an old towel nearby.
Step 4: Remove the metal fasteners
The metal clamps holding your kitchen sink to the underside of your counter should now be loosened using a screwdriver. When finished, turn them so that they are facing the center of your kitchen sink for easy removal.
Step 5: Cutting the Sealant
The seal between the counter and sink should then be broken by running your Stanley knife or other cutting tool over the sealant on the top side of the counter.
Step 6: Take out the sink
You may now securely remove the old unit from your kitchen sink by pushing up from underneath and pushing the connection clips in.
Once the area has been cleaned up, use a putty knife or other flat metal tool to remove any last bits of sealant and filth from the countertop cutout’s rim.
Conclusion
The kitchen sink replacement may get scuffed and filthy over time. Learn how to install trash disposal in place of your kitchen sink to improve the operation of the room and give it a fresh look. Sinks may be divided into two categories: drop-in sinks and undermount sinks. When you follow these detailed directions, installing both is rather simple.


Comments